Analysis and Design
We will use a bottom-up approach to design our application. We start from the database layer, then hibernate layer and finally the Spring layer.
Database
For implementing this requirement, we create a table PRODUCT. It has basic information about a product like name, description, partnumber, unit price etc. We do not have any more table for fulfilling this requirement. However, if you create a complex application, your product information might be normalized into multiple related tables.
Below is the CREATE table statement for creating the PRODUCT table.
 CREATE TABLE IF NOT EXISTS `product` (
  `product_id` int(11) NOT NULL AUTO_INCREMENT,
  `name` varchar(50) NOT NULL,
  `partnumber` varchar(50) NOT NULL,
  `description` varchar(1024) NOT NULL,
  `thumbnail_url` varchar(240) DEFAULT NULL,
  `buyable` char(1) NOT NULL DEFAULT 'Y',
  `unitprice` decimal(8,2) NOT NULL,
  PRIMARY KEY (`product_id`)
) ENGINE=InnoDB DEFAULT CHARSET=latin1;
There is two sql script in the github repository root folder create_tables.sql and product_load.sql. As the name suggests, the first sql can be used to create a database and PRODUCT table. The second sql can be run to insert some starter products.
Hibernate
Nothing to think about here! We will have a hibernate class Product.java which will be mapped to PRODUCT table. If you would want to reverse engineer the Product.java from the database table, review the steps in the article Reverse Engineering Hibernate objects using JBoss eclipse plugin
Spring
We will have a single Controller, which will have different methods for each verb like GET, PUT, POST and DELETE and will act upon Product table data. Following the Spring convention, we will interact with the database using the following layered approach
Spring Controller -> Service -> DAO -> Hibernate -> Database
Spring Controller:
CatalogRestController
Service:
ProductService
ProductServiceImpl
DAO:
ProductDAO
ProductDAOImpl
Furthermore, the Rest controller will have the following methods
@RequestMapping(method = RequestMethod.GET)
public List<Product> getProducts(); - Get all products

@RequestMapping(value = "/{productId}", method = RequestMethod.GET)
public ResponseEntity<?> getProduct(@PathVariable Integer productId) <- Get Products with ProductId

@RequestMapping(method = RequestMethod.POST)
public ResponseEntity<?> add(@RequestBody Product input) <- Insert a product for input received

@RequestMapping(value = "/{productId}", method = RequestMethod.PUT)
public ResponseEntity<?> update(@PathVariable Integer productId,
@RequestBody Product input) <- Update product information for productId

@RequestMapping(value = "/{productId}", method = RequestMethod.DELETE)
public ResponseEntity<?> remove(@PathVariable Integer productId) <- Delete product for the provided productId
The above also shows at a high level usage of Spring annotations for specifying different verbs.
Word of caution: This design allows a REST client to insert, delete or update records in database, without any authentication and authorization. For a production application, generally, the only verb which might allow access without authorization is the GET. All the other verbs which modify the database might be authenticated and authorized. Oauth is a commonly used open standard of authorization used to authorize client before they can make changes to the underlying data source.
We will need to further create XML configuration file for web application, Spring framework and add libraries. We will cover this in environment setup and development sections.
Environment Setup
- Open eclipse and create a "Dynamic Web Project" in eclipse with the name "catalog-service".
- Click next, then next and finish.
- If you are using Maven or Gradle, setup to download libraries for Hibernate 4 or above, Spring 4.1 or above and MySQL drivers. If you are using Spring 4.1, make sure to also include the latest libraries for Jackson FastXML. The conversion of Object to JSON and vice versa is handle by Jackson library and it does not work without the latest libraries.
- If you are not using maven or gradle, make sure the following jars are in your WEB-INF/lib folder as provided in the below screenshot

The source code in the GitHub contains all required libraries.
Web.xml configuration
We configure Spring DispatcherServlet, specify the patch to Spring configuration file (if not using default path and file name) and map the request to a URL pattern. For this project, we use *.json mapping. Hence, all the request URL should have .json at the end. Note that, if you perform a partial URL mapping like /product/*, you will have to configuring the ViewResolver, so that it could use the appropriate resolvers for JSON. However, when an extension mapping like .json, no ViewResolver configuration is required.
<?xml version="1.0" encoding="UTF-8"?>
<web-app xmlns:xsi="http://www.w3.org/2001/XMLSchema-instance"
xmlns="http://java.sun.com/xml/ns/javaee" xsi:schemaLocation="http://java.sun.com/xml/ns/javaee http://java.sun.com/xml/ns/javaee/web-app_3_0.xsd" id="WebApp_ID" version="3.0">
  <display-name>Catalog REST Services</display-name>
  <welcome-file-list>
    <welcome-file>Login.jsp</welcome-file>
  </welcome-file-list>
  <servlet>
    <servlet-name>CatalogServlet</servlet-name>
    <servlet-class>org.springframework.web.servlet.DispatcherServlet</servlet-class>
    <init-param>
      <param-name>contextConfigLocation</param-name>
      <param-value>/WEB-INF/Catalog-Servlet.xml</param-value>
    </init-param>
    <load-on-startup>1</load-on-startup>
  </servlet>
  <servlet-mapping>
    <servlet-name>CatalogServlet</servlet-name>
    <url-pattern>*.json</url-pattern>
  </servlet-mapping>
</web-app>
WEB-INF/Catalog-Servlet.xml
Most of the tags are self-explanatory. Although this is a Spring configuration, it references Hibernate related files and hibernate.cfg.xml. The "datasource" needs to be updated with your username, password and dbname. Also, note the configuration for transactionManager. Once this is configured, Spring handles the hibernate transactions and you do not have to manually manage the transaction in your code. Just mark the service method with @Transactional annotation.
The ProductDao and ProductService is also declared. We have marked them as @Autowired and hence we do not have to pass the reference for productDao into productService in the XML.
<?xml version="1.0" encoding="UTF-8"?>
<beans xmlns="http://www.springframework.org/schema/beans"
	xmlns:xsi="http://www.w3.org/2001/XMLSchema-instance"
	xmlns:context="http://www.springframework.org/schema/context"
	xmlns:mvc="http://www.springframework.org/schema/mvc"
	xmlns:tx="http://www.springframework.org/schema/tx"
	xsi:schemaLocation="http://www.springframework.org/schema/beans http://www.springframework.org/schema/beans/spring-beans-4.1.xsd
		http://www.springframework.org/schema/context http://www.springframework.org/schema/context/spring-context-4.1.xsd
		http://www.springframework.org/schema/mvc http://www.springframework.org/schema/mvc/spring-mvc-4.1.xsd
		http://www.springframework.org/schema/tx http://www.springframework.org/schema/tx/spring-tx-4.1.xsd">

	<mvc:annotation-driven />
<!-- Configure JDBC Connection - @TODO update url, username and password per your database configuration -->
      <bean id="dataSource"
            class="org.springframework.jdbc.datasource.DriverManagerDataSource">
            <property name="driverClassName" value="com.mysql.jdbc.Driver" />
            <property name="url" value="jdbc:mysql://localhost:3306/tfcom_articles" />
            <property name="username" value="admin" />
            <property name="password" value="admin*" />
      </bean>

    <tx:annotation-driven transaction-manager="transactionManager" />

     <bean id="transactionManager"
            class="org.springframework.orm.hibernate4.HibernateTransactionManager">
        <property name="sessionFactory" ref="sessionFactory"/>
    </bean>


    <bean id="sessionFactory" class="org.springframework.orm.hibernate4.LocalSessionFactoryBean">
    <property name="dataSource">
                  <ref bean="dataSource" />
            </property>
    <property name="configLocation" value="classpath:hibernate.cfg.xml" />
	</bean>

	<context:component-scan base-package="com.tech_freaks.catalog"/>

	<bean id="productDao"
   	class="com.tech_freaks.catalog.dao.ProductDAOImpl"/>

   	<bean id="productService"
   	class="com.tech_freaks.catalog.service.ProductServiceImpl"/>
</beans>
src/hibernate.cfg.xml
We have used the XML configuration for hibernate and not annotations. This mainly declares the Product hibernate class and its mapping file Product.hbm.xml.
The commented fields in this file will need to be un-commented, if you are reverse engineering the hibernate object as explained in the article Reverse Engineering Hibernate objects using JBoss eclipse plugin
Development
Hibernate Object
Product.java - We reverse engineer this class from the database. It is the model for the application, which is mapped to the database table. It is self-explanatory.
DAO layer
AbstractDAO<T> - This is a generic class which contains common calls to hibernate API. All DAO can extend this class to reuse these pre-implemented class. Note, how the sessionFactory is injected by Spring framework into the DAO layer using @Autowired annotation. The sessionFactory is declared in the Catalog-Servlet.xml file which we defined earlier.
The JavaDoc comments on each of the method, explain the use of the function.
package com.tech_freaks.catalog.dao;

import org.hibernate.Session;
import org.hibernate.SessionFactory;
import org.springframework.beans.factory.annotation.Autowired;

/**
 * Generic Base class which encapsulates hibernate specific calls which will be available from the
 * extending DAO which is mapped to the database table.
 * @author Tech Freaks
 *
 * @param <T> - The Hibernate object which it works on
 */
public class AbstractDAO <T> {

	@Autowired
    private SessionFactory sessionFactory;

	/**
	 * Gets a current session from the hibernate factory
	 * @return
	 */
    protected Session getSession(){
        return sessionFactory.getCurrentSession();
    }

    /**
     * Generic method for finding by primary key.
     * @param id  - Primary key value in integer
     * @param myClass - Type of Class which will be loaded
     * @return T representing instance of the loaded hibernate class instance
     */
    public <T>  T findById(Integer id, Class myClass) {
    	return (T) getSession().load(myClass, id);
    }

    /**
     * Inserts record into database
     * @param t - Instance of the Hibernate object which needs to be persisted in the db
     * @return - Key value of the newly inserted record
     */
    public Integer persist(T t) {
       return (Integer) getSession().save(t);
    }

    /**
     * Updates the database for provided generic type
     * @param t Generic type for the hibernate object
     */
    public void update(T t) {
    	getSession().update(t);
    	getSession().flush();
    }

    /**
     * Deletes the entity from the database for the provided generic type
     * @param t  Generic type for the hibernate object
     */
    public void delete(T t) {
        getSession().delete(t);
        getSession().flush();
    }
}
ProductDAOImpl & ProductDAO
This is the actual DAO interface and its implementation. It extends the AbstractDAO<Product> and utilizes the methods defined there.
package com.tech_freaks.catalog.dao;

import java.util.List;

import org.hibernate.Session;
import org.hibernate.SessionFactory;

import com.tech_freaks.catalog.model.Product;

public class ProductDAOImpl extends AbstractDAO<Product> implements ProductDAO {


	/**
	 * Fetches all the product from the PRODUCT table
	 */
	@Override
	public List<Product> getAllProducts() {
		Session session = getSession();
        List<Product> productList = session.createQuery("from Product").list();
        return productList;
	}

	/**
	 * Fetches product based on the primary key productId
	 */
	@Override
	public Product findById(Integer id) {
		return (Product) getSession().get(Product.class, id);
	}

	/**
	 * Inserts a new record in the product table.
	 */
	@Override
	public Integer insert(Product product) {
		return persist(product);
	}

	/**
	 * Loads the product using the primary key and then removes it from the database.
	 */
	@Override
	public boolean remove(Integer id)  {
		boolean deleted = false;
		Product delProduct = findById(id);
		if(delProduct!=null) {
			delete(delProduct);
			deleted = true;
		}
		return deleted;
	}
}
ProductServiceImpl & ProductService
The is the Service layer interface and its implementation for the Product manipulation. It internally calls the DAO layer. The Service layer is called from the Controller class. The methods are self-explanatory.
The below excerpt from ProductServiceImpl shows @Autowiring annotation on productDAO, which is injected in by the Spring framework. Also, each method is marked with annotation @Transactional. This is the reason, you do not see any code related to transaction management in the DAO layer. Spring manages the transaction code for you.
...
@Autowired
	private ProductDAO productDAO;

	@Override
	@Transactional
	public List<Product> listProducts() {

		return productDAO.getAllProducts();
	}
...
CatalogRestController is the entry point into the code for all REST service verbs. The @RestController annotation eliminates the need to mark each method with @ResponseBody when it returns an Object or a Collection of objects. Now even without @ResponseBody, when an object or collection of object is returned, it is automatically converted into JSON. The class is also marked with @RequestMapping("/products"). This means the REST URL for every verb call will have '/products' in it, after the application context name. Now, each method is marked with @RequestMethod. We follow the REST specification by mapping GET to retrieve data, POST for insert data, PUT for update data and DELETE for deleting data.
If we look at the method "add", there are certain points worth noticing.
First, after every REST call, we return a HttpStatusCode. If the insert is successful, we return CREATED status or 201. If it fails, because the Product object was not populated, it means, the JSON was not well formed. In this case, we return BAD_REQUEST or 400. This helps the client to read the HttpHeader in the response and take appropriate action.
Second, after insert, the method create a REST URL to fetching the newly inserted record. This is set in the Location HttpHeader.
The private method isValid() is called internally to perform some basic validation before the service layer is invoked.
Similarly, all the other method are developed. The complete CatalogRestController code is below.
package com.tech_freaks.catalog.controller;

import java.net.URI;
import java.util.List;

import org.apache.commons.logging.Log;
import org.apache.commons.logging.LogFactory;
import org.hibernate.HibernateException;
import org.springframework.beans.factory.annotation.Autowired;
import org.springframework.http.HttpHeaders;
import org.springframework.http.HttpStatus;
import org.springframework.http.ResponseEntity;
import org.springframework.util.StringUtils;
import org.springframework.web.bind.annotation.PathVariable;
import org.springframework.web.bind.annotation.RequestBody;
import org.springframework.web.bind.annotation.RequestMapping;
import org.springframework.web.bind.annotation.RequestMethod;
import org.springframework.web.bind.annotation.RestController;
import org.springframework.web.servlet.support.ServletUriComponentsBuilder;

import com.tech_freaks.catalog.model.Product;
import com.tech_freaks.catalog.service.ProductService;

@RestController
@RequestMapping("/products")
/**
 * Entry point for REST service calls. Different method for handling insert, update, delete and get
 */
public class CatalogRestController {

	protected final Log logger = LogFactory.getLog(getClass());

	@Autowired
	private ProductService productService;

	@RequestMapping(method = RequestMethod.GET)
	public List<Product> getProducts() {
		return productService.listProducts();

	}

	@RequestMapping(value = "/{productId}", method = RequestMethod.DELETE)
	public ResponseEntity<?> remove(@PathVariable Integer productId) {
		boolean deleted = false;
		ResponseEntity<?> response = null;
		try {
			deleted = productService.removeProduct(productId);
		} catch (Exception e) {
			logger.error("Error deleting product from database: "
					+ e.getMessage());
		}
		if (deleted)
			response = new ResponseEntity<>(HttpStatus.OK);
		else
			response = new ResponseEntity<>(HttpStatus.NO_CONTENT);
		return response;
	}

	@RequestMapping(value = "/{productId}", method = RequestMethod.GET)
	public ResponseEntity<?> getProduct(@PathVariable Integer productId) {
		ResponseEntity<Product> response = null;
		Product product = productService.getProduct(productId);
		if (product != null) {
			response = new ResponseEntity<>(product, HttpStatus.OK);
		} else {
			response = new ResponseEntity<>(HttpStatus.NO_CONTENT);
		}
		return response;
	}

	@RequestMapping(value = "/{productId}", method = RequestMethod.PUT)
	public ResponseEntity<?> update(@PathVariable Integer productId,
			@RequestBody Product input) {
		ResponseEntity<?> response = new ResponseEntity<>(HttpStatus.OK);
		logger.info("Product Id to be updated is " + productId);
		logger.info("New Product Name will be " + input.getName());
		try {
			if (productId > 0 && isValid(input)) {
				input.setProductId(productId);
				productService.updateProduct(input);
				response = new ResponseEntity<>(HttpStatus.OK);

			} else {
				response = new ResponseEntity<>(HttpStatus.BAD_REQUEST);
			}
		} catch (HibernateException he) {
			logger.error("Unable to update product in database: "+ he.getMessage());
			response = new ResponseEntity<>(HttpStatus.NO_CONTENT);
		} catch (Exception e) {
			logger.error("Unable to update product in database: "+ e.getMessage());
			response = new ResponseEntity<>(HttpStatus.BAD_REQUEST);
		}
		return response;
	}

	@RequestMapping(method = RequestMethod.POST)
	public ResponseEntity<?> add(@RequestBody Product input) {
		HttpHeaders httpHeaders = new HttpHeaders();
		ResponseEntity<?> response = null;
		if (isValid(input)) {
			logger.info("Product description is " + input.getDescription());
			try {
				Integer productId = productService.createProduct(input);
				URI location = ServletUriComponentsBuilder
						.fromCurrentServletMapping()
						.path("/products/{productId}.json").build()
						.expand(productId).toUri();
				logger.info("Location uri is " + location.toString());
				httpHeaders.setLocation(location);
				response = new ResponseEntity<>(null, httpHeaders,
						HttpStatus.CREATED);
			} catch (Exception e) {
				logger.error("Unable to insert new product in database: "
						+ e.getMessage());

				response = new ResponseEntity<>(null, httpHeaders,
						HttpStatus.UNPROCESSABLE_ENTITY);
			}
		} else {
			response = new ResponseEntity<>(null, httpHeaders,
					HttpStatus.BAD_REQUEST);
		}
		return response;
	}

	/*
	 * Internally used to validate the fields to make sure, all required fields
	 * are present before calling the service layer for insert
	 */
	private boolean isValid(Product product) {
		boolean valid = false;
		if (product != null) {
			if (!StringUtils.isEmpty(product.getName())
					&& !StringUtils.isEmpty(product.getDescription())
					&& !StringUtils.isEmpty(product.getPartnumber())
					&& !StringUtils.isEmpty(product.getName()))
				valid = true;
		}
		return valid;
	}
}
At this point, you can download the complete project from GitHub at https://github.com/tech-freaks/catalog-service
Unit Testing
The first part of the unit test, is to figure out the REST URL to invoke. We can figure this out, if we look at the CatalogRestController and web.xml. Remember, web.xml maps *.json to the controller. Hence, for all verbs our URL will end with .json.
We used the following information:
Tomcat host: http://localhost:8080
Application Context: /catalog-service
CatalogRestController mapping: /products
Now, the method getProducts() do not have any value mapping. But, it needs to be a GET call. Hence, for accessing this method, you will use the URL http://localhost:8080/catalog-service/products.json and it needs to be a GET call. You can therefore, just paste the URL in a browser and it will show the JSON with all products.
Similarly, if you look at getProduct(), the request mapping has /{productId}. This is equivalent to the primary key, product_id value in the database. Hence, the URL will be http://localhost:8080/catalog-service/products/1.json , where product_id=1. This will be again a GET verb again, as we are fetching information.
Now, similarly, we can figure out the remaining URL for calling remove(), update() and add(). The below table provide the remaining URL and verbs.
|
Method |
URL |
Verb |
|
remove() |
http://localhost:8080/catalog-service/products/{productId}.json |
DELETE |
|
update() |
http://localhost:8080/catalog-service/products/{productId}.json |
PUT |
|
add() |
http://localhost:8080/catalog-service/products.json |
POST |
Where {productId} will be replaced by product_id value in the database.
Now, there will be two question:
1. How to invoke DELETE, PUT and POST verb? When we paste the URL in the browser, they all are by default GET requests.
2. How to pass the product information for add() and update()?
For # 1, we can download a browser plugin called as Poster (Just search Poster plugin), which is available for Chrome and Firefox. The below screenshot shows, Poster in action for Firefox.
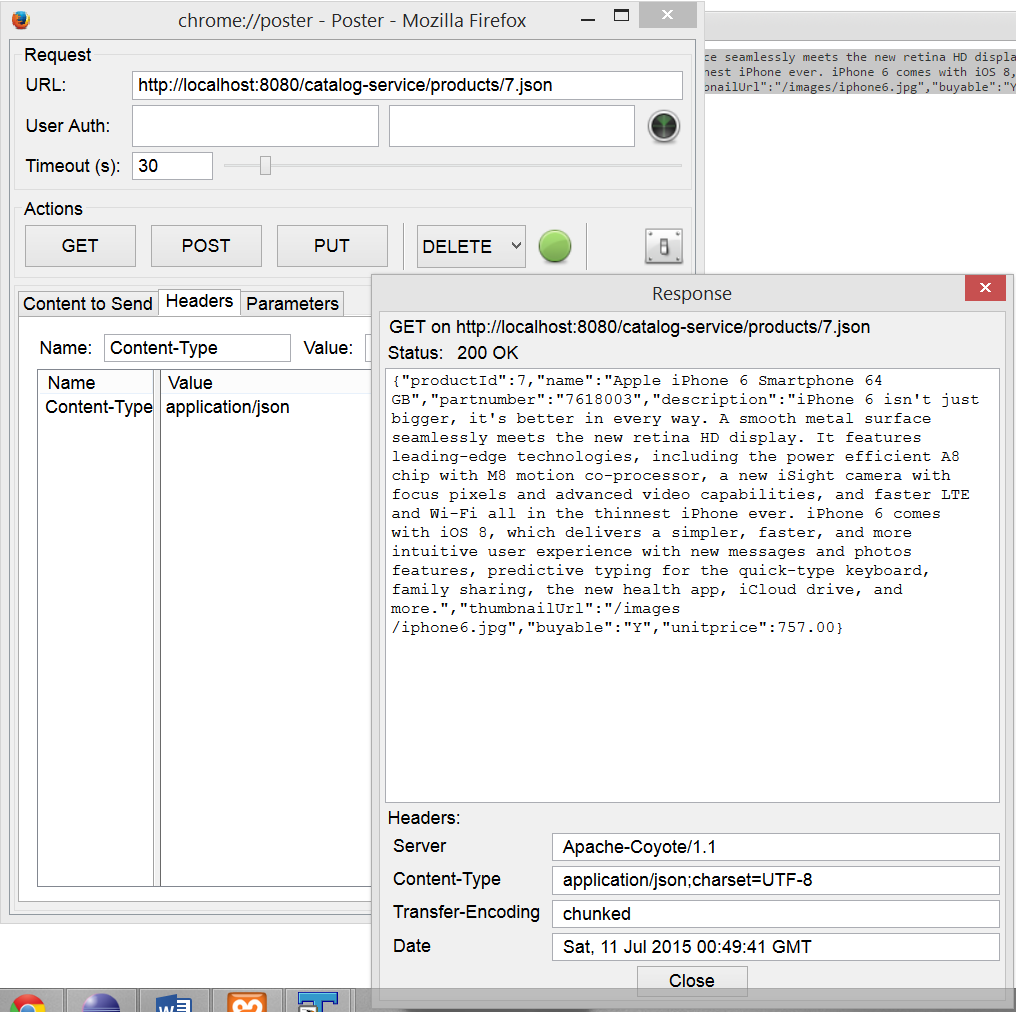
For # 2, we need to send an input json containing the product information to be insert or updated in the product table. The POST performs and insert, while PUT updates. The json format is exactly as the response received from http://localhost:8080/catalog-service/products/{productId}.json GET verb. However, we have provided an input file by the name POST_PUT_Input.json, which is in the root folder of the project.
In Poster plugin, you need to make sure, that to add a Header by the name "Content-Type" with value "application/json".
For integration testing, we generally run the client code like the mobile application in same network and point to the URLs provided above. However, integration testing is beyond the scope of this article.
This completes the workshop for creating a simple product REST service using Spring MVC 4.
Happy RESTing!