This workshop is for you, if:
- You are looking to use an IDE for writing your JSP and Servlet code
- You are trying to figure out, how to integrate your Eclipse IDE with Tomcat
This workshop is not for you, if:
- You do not have any clue what JSP or Servlet is and you are trying to understand it
Introduction:
Writing endless JSP/Servlet code using Notepad, compiling it from command line and then deploying them in Tomcat can be a tedious job. Using an IDE like Eclipse for web development, does make life easy. It takes up the work of finding compilation errors before even you start to compile, which is a big relief. Also, no need to go back to the command line... set the CLASSPATH for each new library which you want to use. But, won't it be an icing on the cake, if we could just write the code compile it and test it, without deploying the compiled file to Tomcat server, for every change we do to the file?
Yes, that will be awesome! This is what we are trying to do in the workshop. Have our work environment configured such that, we will just make changes, compile it and test in browser without having to worry about deploying etc again and again.
Software requirement:
For this workshop the below mentioned versions of the software will be necessary. It may be possible to work with a different version, as long as the versions of different softwares are compatible with each other.
- J2SE 1.5 or above
- Eclipse 3.4 - It can be download and installed from Eclipse website
- Tomcat 6.x - Download and install from Apache website
- Sysdeo Eclipse Tomcat Launcher plugin - Download the latest version of Sysdeo Eclipse Tomcat Launcher plugin from the Eclipsetotale website
Installing Tomcat and Eclipse:
- Refer article Java Hello World using Eclipse for details regarding installing and setting up Eclipse
- Refer article First JSP/Servlet Workshop for details regarding installing and setting up Tomcat
Integrating Tomcat with Eclipse using Tomcat Launcher Plugin
Let us see, how we can bell the Tomcat within the Eclipse environment
- First, let us unzip the downloaded Sysdeo Tomcat plugin and extract to the location <Eclipse Installation Directory>/dropins folder.
-
Restart Eclipse if it already open.
-
You will see three tomcat icon on the eclipse toolbar. Tomcat start, Tomcat stop and Tomcat restart. Yippie!! Let us try starting Tomcat. It looks like eclipse was unable to locate certain information for Tomcat. The error message reads, "Tomcat settings should be set in Tomcat Preference Page".
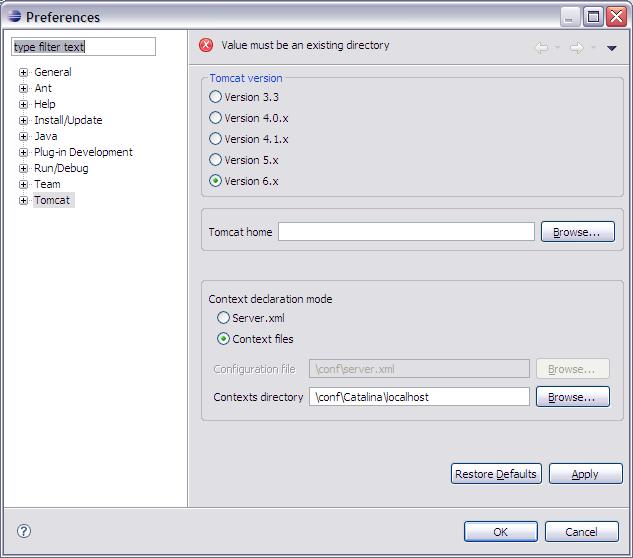
- So, let us check this preference page. From the top menu, select Windows --> Preference (See image above).
- We need to set the correct values here:
Select Version 6.x
Browse and Select Tomcat Home
Other information will get automatically populated - In this window, there are other tabs like Advanced, JVM settings, Source Path etc under Tomcat tree expand icon. You may want to verify the JVM settings. Ensure that the JRE is set to 1.5 or above. Once done, just click Ok to save and exit that window.
- Now, click the Tomcat start button and you should be able to startup logs in the console.
- Let check, if Tomcat is working now. In the web browser, type http://localhost:8080/
You should be able to see Tomcat standing proudly!
Well, we are done! But, let us try a simple web context, a servlet and a JSP, all using Eclipse.
Simple web app using Eclipse:
- We need to create a new project in Eclipse. From the menu, we need to select File --> New --> Project

- In the new project window, expand the Java section and you will be able to see Tomcat Project (See image above). Select it and click Next.

- In the Java Project settings, provide a Project Name. You can also override the location where you want the project files to be present (see image above). Click Next when done.

- In this step, you will have to provide a context name. This is the same context name by which the web application will be created in Tomcat. You can verify this from the manager console later. So, provide a context name and move ahead. Do not forget to put a slash (/) before the context name (see image above). We are done! Let us click finish.
- You will notice that, the creation of the project itself creates most of the directories and files needed.
- Let us now verify, if build path and libraries are present for compiling our servlet.
- We can get the details in the Project Properties window and Java Build Path section
Source tab:
The Default output folder should be <ContextRoot>/WEB-INF/classes folder. This means, all compiled classes will be added to this folder.
The Source folder on build path, should have the folder listed where you are planning to have your Java source files. < ContextRoot >/WEB-INF/src will be the folder by default.
Library tab:
We will have to add any external libraries which we are planning to use in our web application. You will see, servlet-api.jar already listed there. This means, we are good to compile our simple servlet.
The only missing thing for the web application is the heart! The web.xml! It would have been great, if the web.xml was added automatically, however, it does not happen. We will have to manually create the web.xml and add it under WEB-INF folder.
- So, let us create the JSP, Servlet and web.xml file using Eclipse:
JSP: We will create the MyFirstJspPage.jsp and place it under <ContextRoot>/ folder
<html>
  <head>
    <title>First JSP</title>
  </head>
  <body>
  <div id="error" style="display:block;"><font color="red">
    <%if(request.getAttribute("errMsg")!=null) { out.println(request.getAttribute("errMsg"));} %>
  </font></div>
  <form name="form" action="servlet/MyFirstServlet">
  First Name: <input type="text" name="firstName" ><br>
  Last Name: <input type="text" name="lastName" ><br><br>
  <input type="submit" name="submit" value="Submit" >
  </form>
  </body>
</html>
Servlet: We will create the MyFirstServlet.java under <ContextRoot>/WEB-INF/src/. Ofcourse, under appropriate package structure in.techfreaks.servlet.
web.xml: We will create the web.xml under <ContextRoot>/WEB-INF/package in.techfreaks.servlet; import java.io.*; import javax.servlet.http.*; import javax.servlet.*; public class MyFirstServlet extends HttpServlet { public void doPost(HttpServletRequest request, HttpServletResponse response) throws ServletException, IOException { String strErrMsg = "Please enter first name and last name"; String strFirstName = request.getParameter("firstName"); String strLastName = request.getParameter("lastName"); if(strFirstName!=null && !strFirstName.equals("") && strLastName!=null && !strLastName.equals("")) { PrintWriter out = response.getWriter(); out.println("Name : "+strFirstName+" "+strLastName); } else { request.setAttribute("errMsg", strErrMsg); request.getRequestDispatcher("../MyFirstJspPage.jsp").forward(request, response); } } public void doGet(HttpServletRequest request, HttpServletResponse response) throws ServletException, IOException { doPost(request, response); } }<?xml version="1.0" encoding="ISO-8859-1"?> <web-app xmlns="http://java.sun.com/xml/ns/javaee" xmlns:xsi="http://www.w3.org/2001/XMLSchema-instance" xsi:schemaLocation=http://java.sun.com/xml/ns/javaee http://java.sun.com/xml/ns/javaee/web-app_2_5.xsd" version="2.5"> <display-name>Simple WebApp</display-name> <description> Simple Web Application </description> <servlet> <servlet-name>MyFirstServlet</servlet-name> <servlet-class>in.techfreaks.servlet.MyFirstServlet</servlet-class> </servlet> <!-- Define the Manager Servlet Mapping --> <servlet-mapping> <servlet-name>MyFirstServlet</servlet-name> <url-pattern>/servlet/*</url-pattern> </servlet-mapping> </web-app>
After you write the servlet, without compilation error and save, if you peep in the file system, you will find the class file automatically compiled at <ContextRoot>/WEB-INF/classes.
Restart Tomcat from Eclipse and we are all ready!
Testing:
We are not testing the complete logic of the servlet here. We will just test to see, if the servlet and JSP are getting called, as expected.
http://localhost:8080/FirstJspServlet/MyFirstJspPage.jsp
The JSP file with first name and last name input should open.
Enter first name and last name and click enter, it should display the name in the next page, which is our servlet.
We are all set now for doing bigger things, using Eclipse IDE! So, sit back€¦. get a cup of coffee€¦ and enjoy writing your JSP and servlet code!
Check the latest article Quick Tomcat and Eclipse Integration €“ Deploying Web apps to Tomcat from within Eclipse which walks through step by step for configuring Tomcat 8 with the latest Eclipse Kepler version