This workshop is for you, if you thinking:
- My simple Java code has a main method. I have heard that JSPs and Servlets do not have main method. So, how does it work?
- I've read a lot about web.xml, servlet callback methods, JSP implicit variables etc. But how to use them all to make it work together?
This workshop is not for you, if you are thinking:
- How to write Java file and compile it?
- I dont have any clue what JSP or Servlet is
- What is a Application server?
- Am an expert writing JSP and Servlets, lets see how others write them!
Requirement:
Create a simple web page which has two fields, first name and last name as input fields.
- When both values are entered and submitted, 'Your Name is : <First Name> <Last name>' should be displayed.
- When any one value is not entered, the web page should display, 'Please enter first name' or 'Please enter Last name' or both as per the entry made by the use
Here we go....
1. Installing an application server:
We will be using Tomcat Application server this example. Download and install Tomcat from the http://tomcat.apache.org/
For this example, we will be using Tomcat 6.x. The table below maps the Tomcat version with Servlet specification. Tomcat 6.x is based on Servlet 2.5 specification. Tomcat 6.x installation requires the existence of J2SE/JRE 1.5 or above.
| Servlet/JSP | Tomcat | J2SE |
| 2.5/2.1 | 6.0.16 | 1.5 or above |
| 2.4/2.0 | 5.5.26 |
1.3 or above |
| 2.3/1.2 | 4.1.37 | 1.2 or above |
Below are the easy steps which will guide you through the installation process in Windows environment.
- Click Next on the first screen and accept the terms of agreement to proceed with the installation.

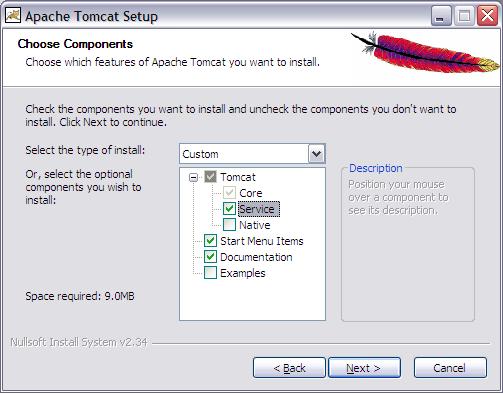
- In the Choose component screen (See the screenshot above), select 'Services' checkbox to enable Tomcat as Windows service. This is a nice feature to have. You may also want to select 'Examples', if you want to have some JSP/Servlet samples installed by default. Click Next to continue.

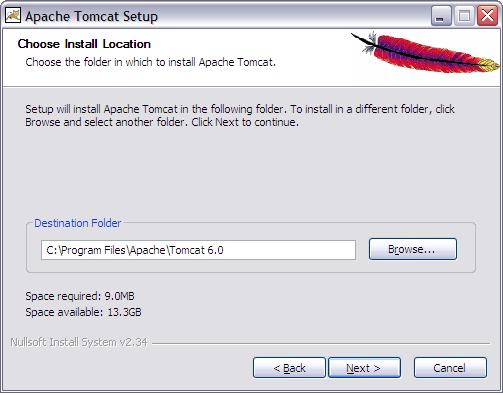
- In the Choose Install Location screen (See the above screenshot), browse to the folder where you want Tomcat to be installed and click Next.

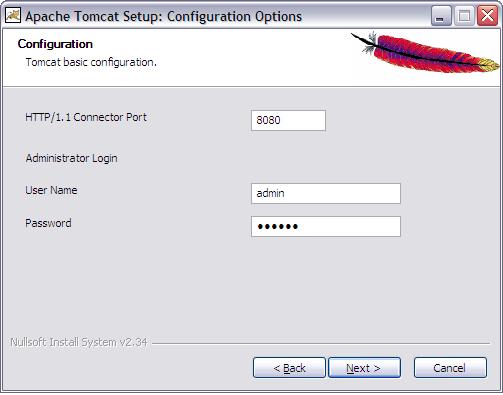
- In the Configuration screen, select the port on which you want Tomcat should listen to. By default it will be 8080 and it can be left as it is, unless you have some other application already listening on this port. You may also want to provide a password for the admin user

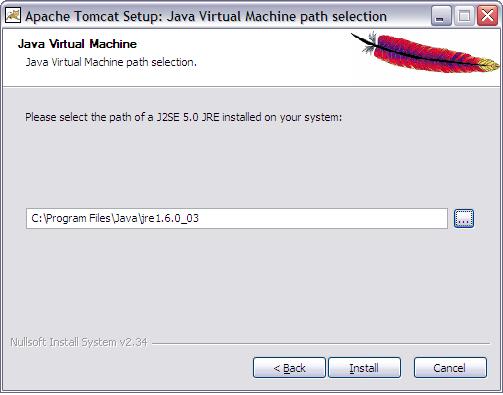
- In the Java Virtual Machine screen, by default any SDK or JRE of 1.5 or above will be displayed. You will need to have either JRE 1.5 or higher or SDK 1.5 or higher for installing Tomcat 6.x. Click Next to begin the installation process.
- Click the finish button to complete the installation process.
- You can now test your installation by starting Tomcat and access the URL http://localhost:8080/ assuming that Tomcat is listening on port 8080.
- Tomcat will be waiting there to congratulate you, on successful installation!
2. Design Notes:
Let us try to make a list of the different things which we need to write.
- A simple HTML page, with two text fields and a submit button. Will that do? Well, let us start with it and see.
- A servlet class. It needs to get the parameters from request and print it out. It also needs to validate first name and last name and send back to the page, if validation error is found.
- web.xml - We need to register our servlet in this deployment descriptor.
3. Writting the code:
- HTML: MyFirstPage.html will mainly contain two simple text input and a submit button. Below is the html code:
<html>
  <head>
    <title>Test HTML</title>
  </head>
  <body>
  Please enter first Name and last name
  <form name="form" action="">
  First Name: <input type="text" name="firstName" ><br>
  Last Name: <input type="text" name="lastName" ><br><br>
  <input type="submit" name="submit" value="Submit" >
  </form>
  </body>
</html>- Java Servlet: MyFirstServlet
- It needs to extend javax.servlet.http.HttpServlet to be a Servlet.
- It overrides the doGet and doPost methods. In the doPost we have our code to fulfill the requirement for our simple webapp.
- From doGet, we give a call to doPost method. So, irrespective of the GET or POST request from MyFirstPage.html, we will have the same logic.
package in.techfreaks.servlet;

import java.io.*;
import javax.servlet.http.*;
import javax.servlet.*;

public class MyFirstServlet extends HttpServlet {

public void doPost(HttpServletRequest request, HttpServletResponse response)
throws ServletException, IOException {
String strErrMsg = "Please enter first name and last name";
String strFirstName = request.getParameter("firstName");
String strLastName = request.getParameter("lastName");
if(strFirstName!=null && !strFirstName.equals("") && strLastName!=null && !strLastName.equals("")) {
PrintWriter out = response.getWriter();
out.println("Name : "+strFirstName+" "+strLastName);
} else {
request.setAttribute("errMsg", strErrMsg);
request.getRequestDispatcher("../MyFirstPage.html").forward(request, response);
}

}

public void doGet(HttpServletRequest request, HttpServletResponse response)
throws ServletException, IOException {
doPost(request, response);
}

}
The above servlet will have to be compiled before it can be deployed. You will have to include the servlet jar in classpath for compilation, without which we will get compilation errors. Since we have Tomcat already installed, we can use servlet jar from Tomcat installation itself. The path for the jar file is <Tomcat Install Dir>\lib\servlet-api.jar
-
Creating the deployment descriptor (web.xml):
The deployment descriptor (web.xml) is a mandatory configuration file as per the Servlet specification. For our example, we have only the bare minimum entries here as needed for our requirement. It mainly contains entries to registered our new servlet. Also, it needs to map the servlet to appropriate URL pattern. Below is the complete web.xml file:
<?xml version="1.0" encoding="ISO-8859-1"?>
<web-app xmlns="http://java.sun.com/xml/ns/javaee"
   xmlns:xsi="http://www.w3.org/2001/XMLSchema-instance"
   xsi:schemaLocation=http://java.sun.com/xml/ns/javaee
   http://java.sun.com/xml/ns/javaee/web-app_2_5.xsd" version="2.5">
 <display-name>Simple WebApp</display-name>
  <description>
    Simple Web Application
  </description>  <servlet>
    <servlet-name>MyFirstServlet</servlet-name>
    <servlet-class>in.techfreaks.servlet.MyFirstServlet</servlet-class>
  </servlet>  <!-- Define the Manager Servlet Mapping -->
  <servlet-mapping>
    <servlet-name>MyFirstServlet</servlet-name>
      <url-pattern>/servlet/*</url-pattern>
  </servlet-mapping>
</web-app>
Note that our servlet is mapped in such a way that, it will be called whenever the URL contains /servlet/ in it. For example: http://localhost:8080/simple-webapp/servlet/ABC will also call our servlet. By the servlet will be called, we mean that, the service method of our servlet will be called, which will internally call either doGet or doPost based on the type of call to our servlet.
4. Creating a new Web context in Tomcat:
For the new application created, we need to add a context in Tomcat. We can have multiple web applications, each having a different context in Tomcat.
There are multiple ways of creating a new web context in Tomcat.
- Deploying a WAR file
- Adding a new context folder under <Tomcat_Home>\webapps
- Adding a new context folder at any location and pointing Tomcat to it
-
Deploying a WAR file:
Create a folder structure as below. The web application root will contain WEB-INF folder and web.xml folder. This is as per the servlet specification. WEB-INF/classes folder will contain all the class file along with its package folder structure. For our application, we will have the path for our servlet WEB-INF/classes/in/techfreaks/servlet/MyFirstServlet.class. The WEB-INF/lib can contain other third party libraries like JDBC drivers, Graph components, struts libs etc. For our application, we do not need any third party libraries, so the lib folder will be empty. The web application root folder can contain JSPs, HTMLs, JS, CSS, images etc, directly under it or in other container folders.
simple-webapp
- WEB-INF- lib
- classes
- in
- techfreaks
- servlet
- MyFirstServlet.class
- web.xml
- MyFirstPage.html
Create a WAR (Web ARchive file) from the above structure. We can either use 'jar cvf' command or ZIP utility to create the WAR file based from the folder structure. Create the WAR file by the name simple-webapp.war.
Just drop this simple-webapp.war in <Tomcat_Home>\webapps folder. Start the Tomcat service, if it is not already started, and watch the magic!!! Within a seconds, you will see a new simple-webapp folder created.
Now, you can access our first page using the following URL http://localhost:8080/simple-webapp/MyFirstPage.html.
- Adding a new context folder manually under <Tomcat_Home>\webapps:
For this, we just need to create the folder structure as showed above under <Tomcat_Home>\webapps folder. Restart Tomcat and you are done!
Verify the creation of the context by accessing the URL http://localhost:8080/simple-webapp/MyFirstPage.html
- Deploying an application already present in a different location:
For a web application created in a different location as per the above directory structure, but not under <Tomcat_Home>\webapps, we can deploy the application by telling Tomcat to get the context from that location.
But, how can we tell Tomcat to pick the application from another location.
Tomcat Manager console to rescue!!
Tomcat manager can be accessed using the URL http://localhost:8080/manager/html/ . It will prompt for a user id/password. User Id and password needs to be the one which we entered during our installation process.
Scroll below to the 'Deploy' section and enter the following information and click the Deploy button:
Context Path = Web application context name
WAR or Directory URL = The root folder, which will have the web application code.
5. Putting the code to test:
So, let try to put a small test case for our application.
Test Case 1:
- Access URL http://localhost:8080/simple-webapp/MyFirstPage.html
- Enter First name and last name in the text field and hit the submit button
Expected Result: The following should be displayed
Name: <first name> <last name>
Test Case 2:
- Access URL http://localhost:8080/simple-webapp/MyFirstPage.html
- Leave either first name or last name or both blank, and hit the submit button
Expected Result: The page should submit and reload the same page with a error message
Test Case 1 Execution:
Boooom!
Actual Result: The same page is reloading.... (failed)
Lets try to resolve this issue.
First lets see, if the servlet is getting called.
Our mapping in the web.xml is <url-pattern>/servlet/*</url-pattern>
So, lets see if the form is submitting to the current URL.
<form name="form" action="">
There we are! The action is submitting no where. Lets correct this line to
<form name="form" action="servlet/MyFirstServlet">
Now then, lets retest case #1.
Thats great! We get the result as expected.
Test Case 2 Execution:
So, for testing this case, let us leave either First Name or Last Name blank and submit. It comes back to the same page..... but looks like the error message is missing.... isn't it? Yes, right. But, why so? The servlet is setting the error message and sending back to the HTML page.Well, our HTML is static and does not have the ability to get dynamic information. We need the ability to read from 'request' and display in the page dynamically.
No prizes for guessing... but, we need JSPs for this. The JSP will be HTML with extra Java code embedded for reading the error message from request and displaying.
Below is our new MyFirstJspPage.jsp created from MyFirstPage.html:
<html>
  <head>
    <title>First JSP</title>
  </head>
  <body>
  <div id="error" style="display:block;"><font color="red">
    <%if(request.getAttribute("errMsg")!=null) { out.println(request.getAttribute("errMsg"));} %>
  </font></div>
  <form name="form" action="">
  First Name: <input type="text" name="firstName" ><br>
  Last Name: <input type="text" name="lastName" ><br><br>
  <input type="submit" name="submit" value="Submit" >
  </form>
  </body>
</html>
Are we good to retest case #2? Hey wait! Our servlet is forwarding the request back to HTML. We need to correct that right?
Right... We need to correct this in our servlet MyFirstServlet.
Modify the below line:
request.getRequestDispatcher("../MyFirstPage.html").forward(request, response);
to
request.getRequestDispatcher("../MyFirstJspPage.jsp").forward(request, response);
After making the correction, in MyFirstServlet.java, we need to compile the class file.
Now, we are ready to retest case #2.
Now, if either first name or last name is left empty, the same page loads with appropriate error message.
Finally, both the test cases have been executed successfully!
Welcome to Web application development!!
